How to Edit and Save an Active Workflow
Last updated: June 26, 2026
Overview
Once a workflow is created, you can continue to refine it - add phases, restructure tasks, update basic details, or archive it entirely. Editing is available at multiple levels depending on what needs to change.
A workflow is made up of three components:
Phases – Logically group tasks within the workflow (e.g., Intake, Request Review, Negotiations).
Tasks – Actions that contribute to the overall workflow goal (e.g., Buyer Assignment, Manager Approval).
Conditions – Logic that automatically routes the workflow based on defined criteria.
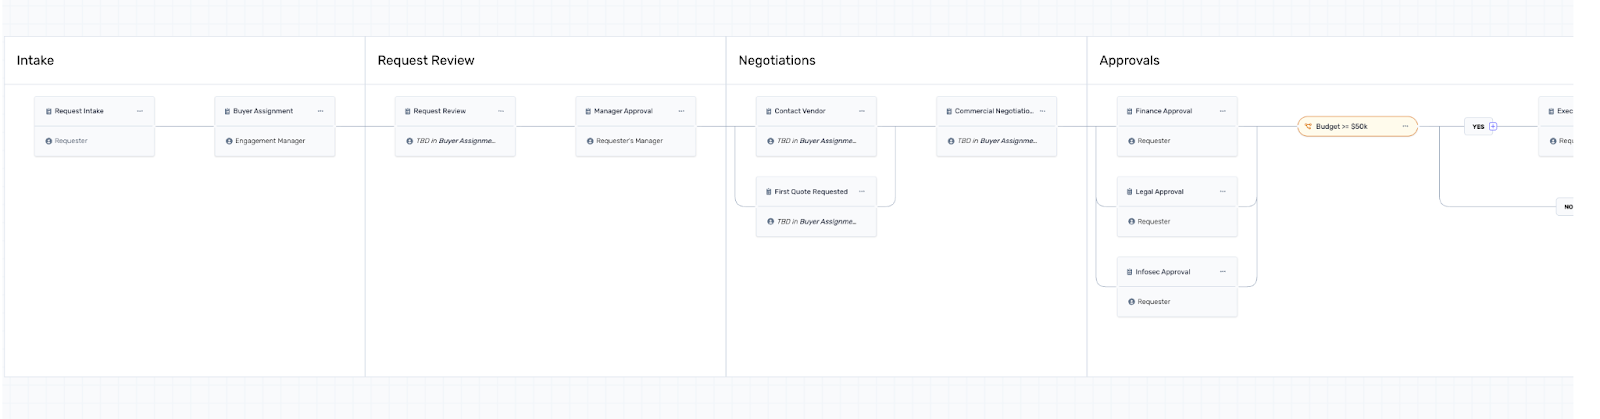
Editing Workflow-Level Details
For changes to the overall workflow — name, description, type, or tags — click the
⋮ (three-dot menu) in the top right corner of the workflow canvas. This gives you four options:

Edit Workflow Details
Click Edit Workflow Details to update the workflow's name, description, type, or tags. Make your changes and save.
Duplicate Workflow
Click Duplicate Workflow to create a copy of the existing workflow. This is useful when you want to make significant structural changes without affecting the original. The duplicate is saved as a new workflow, which you can then edit and publish independently.
Archive Workflow
Click Archive Workflow to retire a workflow that is no longer in use. Archived workflows are removed from the active list but remain accessible for reference.
Working with Phases
Adding a New Phase
To add a new phase, hover over the workflow canvas. A + icon will appear between or alongside existing phases. Click it, enter the phase name, and select Create Phase to add it to the workflow.
? Note: The first phase in a workflow cannot be deleted — only edited.

Editing or Deleting a Phase
To rename or delete a phase, hover over the phase header. An edit icon and a delete icon will appear on the right. Click the pencil icon to rename the phase, or the trash icon to remove it.

Working with Tasks
Adding a Task, Record, or Integration
Within a phase, you can add three types of items:
Task
Record
Integration – An action triggered in an external application as part of the workflow (e.g., sending a Slack message, creating a Jira ticket).
How you add them depends on whether the task should run sequentially or in parallel:
Sequential tasks (one after another) – Click the + icon to the left or right of an existing task box. The new task will be placed before or after the selected task.
Parallel tasks (running at the same time) – Click the + icon at the top or bottom of an existing task box. The new task will run alongside the selected task.
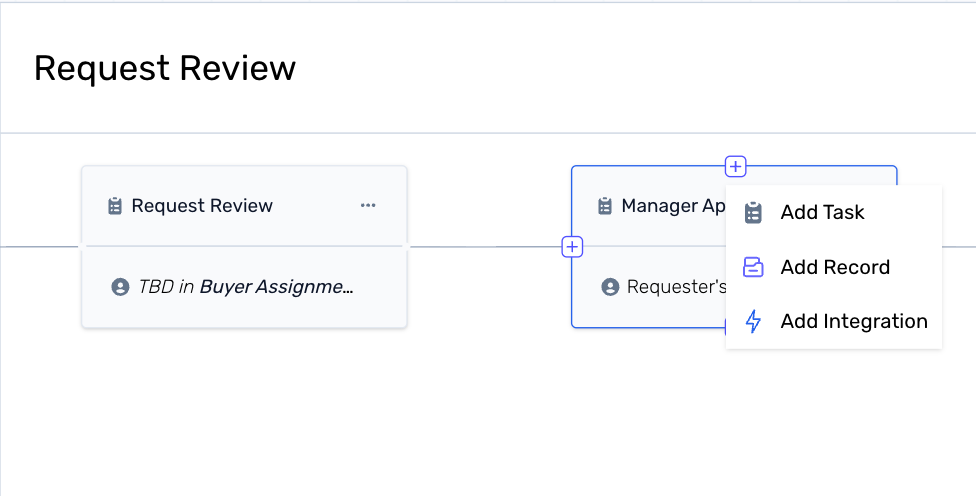

Editing or Deleting an Existing Task
To update or remove a specific task, click the ⋯ (three-dot menu) within the task card. You will see two options:
Edit – Opens the task details panel where you can update the task name, assignee, or other settings.
Delete – Removes the task from the workflow.
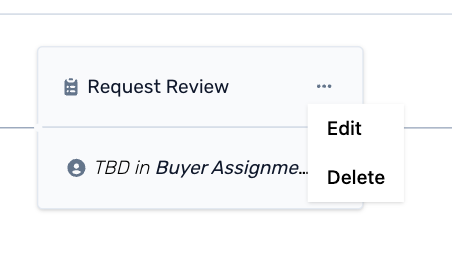
? Note: The first task in the first phase cannot be deleted — only edited.
Saving Your Changes
Once you have made your edits, you have two options at the bottom right of the canvas:
Save As Draft – Saves your changes without publishing. The workflow remains in Draft state and will not affect any active requests. You can continue editing and publish whenever you are ready.
Save & Publish – Saves and immediately publishes the updated workflow. Future requests will use this new version.
? Note: Any requests already in progress are tied to the workflow version they were created under. Edits to the workflow will not affect them — versioning ensures each request follows the process it was originally linked to.